How do you use InLinks on a limited budget if your website has thousands of pages?
You do not have to spend thousands or even hundreds of dollars a month to have access to the best SEO tool of 2021*. However, with a tool as powerful as InLinks, you will need to use the tool carefully, if your business is to make the best use of your budget.
Inlinks starts at just $49 a month which is an extremely low-cost tool for optimizing your web content, building schemas and optimizing your internal links. However, this low fee limits you to 100 pages on the system, which is great for small sites, but with a little common sense, you can use InLinks even on a larger website without breaking the bank. The trick is to be clear as a business owner about your keywords and to understand the InLinks Pricing model. If you are, then you can use InLinks for online marketing effectively on a limited budget.
The good news is that you do not have to add every page to InLinks to get value from the tool. Most large websites really only have relatively few URLs that are bringing in the main organic traffic and usually, only a portion of the site is dedicated to rich, well thought through written content. The strategy, then, is to lock down the “target” pages and then add other pages judiciously, in a thought-through manner.
Here is a step by step strategy for creating content and structure that will dominate the competition.
Step 1: Understand the Charging Structure
Inlinks gets charged by Google every time you analyze a page, so even though we do not always pass this on to you, it helps to understand why we charge credits on top of a URL limit on your account. We have a detailed breakdown of charges on our pricing page. The trick is to remember that the 100 credits reset every month, but the overall number of pages you are allowed on the system for internal linking and adding schema is maxed out by your level. Level 1 gives you 100 pages and 100 credits every month. The biggest problem usually comes in month 1, because adding a page also means we have to analyze that page, which means the first month often uses the credits up very quickly. How can you mitigate that? Well… see step 2!
Step 2: Take The Online Demo
Inlinks offers every user a free 1 to 1 demo of Inlinks and it is so important to their retention rate, they always like to have an incentive to get you to take the demo. They effectively PAY for your training. At the time of going to press, the offer was (about to change) to double credits in your first month using InLinks. That means you can use your first 100 credits to add the full 100 pages into your account for your site and still have 100 credits left over to optimize your content. That doesn’t mean that you can optimize all 100 pages in month 1 because a content audit costs 5 credits, but it does mean you could optimize up to 20 in month 1… which is plenty of work for a single SEO! You can book the demo here. You CAN also just watch a pre-recorded one, but this will not get you the 100 extra credits! (We want to look into the whites of your eyes and check you understood it!)
Step 3: Override the import recommendation
When you start a new project. Inlinks initially estimates how many pages are already indexed in Google and often tries to max out your account or ask you to upgrade. If you are on a tight budget, that’s not very helpful, but luckily it is easy to override. You will be faced with a screen like this:
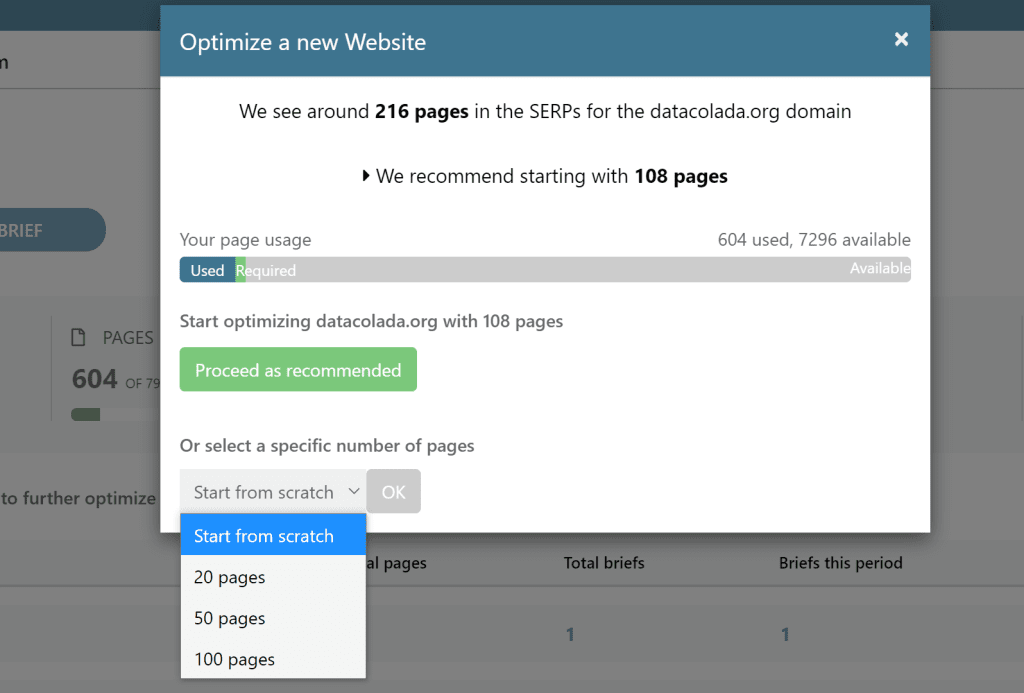
DO NOT PRESS THE GREEN BUTTON YET!
Instead, press the grey options button. If you did the demo in step 2, then I would select “100 pages”. However. if you want to be extremely careful, you might even set the project to zero and then add your pages manually. Basically, if you choose a number here, Inlinks uses SEMRush to select which pages to bring in. (We pay for that too.) This means the pages are added in “SEO Importance order” because SEMRush orders its list based on the amount of organic traffic or prominence it thinks each URL has in the SERPs. If you are a new site, by the way, SEMRush may not even know the URLs on your site… in which case you can start with as many pages as they show and add more later. The important thing to remember here is that for every page you add, InLinks has to do a Google AI lookup when you add a URL, which has a cost and so it costs you a credit. Next month, Inlinks will not have to do that lookup again.
The important thing to remember here is that for every page you add, InLinks has to do a Google AI lookup when you add a URL, which has a cost and so it costs you a credit. Next month, Inlinks will not have to do that lookup again.
InLinks 1: builds schema; 2: builds internal links and 3: helps you optimize your content. If you are ONLY planning to use InLinks to optimize your content, then I would even go so far as to start with a blank project. The main reason for bringing in lots of pages at the start is to build a knowledge graph of your site so Inlainks can start recommending schema and Internal links. So it only makes sense if you WANT those functions. If you do not, then just bring in pages as you optimize them… EXCEPT if you have done the demo and been given 100 extra credits in month 1. These 100 credits have a shelf life, so better to use them straight away.
The IMPORTANT thing to note in this step is that you should not max out your account at this project setup screen.
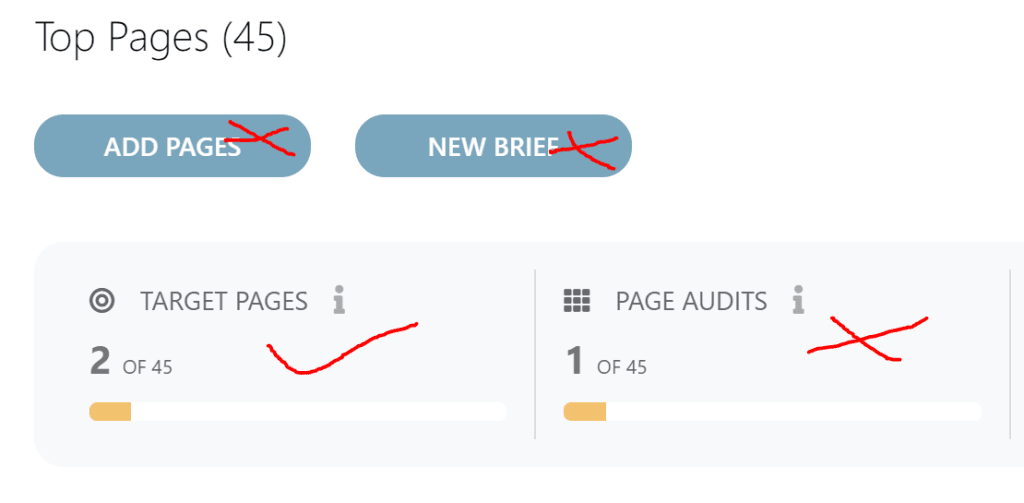
Step 4: Set Targets to your Heart’s Content
Now you have set up a base for your project, there is quite a bit you can do without even spending another credit. The screen you are faced with shows red for “Target Pages” and “Page Audits”. Page Audits will cost you credits, but setting page targets does not. Setting page targets means that a human in the loop helps us determine the main topics/entities that we think each page is about. We ask a human to step in here before we generate schema and links, but setting targets does not cost credits. If you don’t recall from the demo how to do that, here is a quick recap video on associating entities to content.
Step 5: Only Audit a Page when you plan to do the Work
Auditing a page is where many people on a budget spend most of their time. Crafting the perfect content is the best way to combat a lack of PageRank if you do not enjoy the power of a big brand with a big budget. This is where you can eat up your monthly credits because running an audit costs 5 credits and on a starter account you only have 100 a month. (An audit actually includes 10 Google charges, as we need to analyze 10 competing pages of content). Moreover, every time you REANALYZE a page by pressing “CONFIRM SCORE” in the content writing tool, you use another credit. If you have followed the steps up to this point, though, you still have 100 credits to play within month 1. So I recommend running an audit and improving one page at a time and get that page LIVE before waiting for more credits. You can always take up the slack later in step 6.
Step 6: Use your spare credits at the end of your Month
Your account resets every 30 days. You can see when the reset date is in your account information from the main dashboard. They will always reset to 100 if you are on a Level 1 account, even if you were given free credits after the demo, so use them or lose them! This is a chance to do extra audits on pages that you plan to optimize in the future. Alternatively, you can add more pages if you have not yet maxed out your 100-page limit. If you add more pages, you can be very specific about which pages you add. You do not have to start with the recommendations in our list. You can also use them to create a Content Brief or two. A Content Brief is a plan for writing a new article that is not yet published. There is also a sneaky way, here, to accumulate audits over and above the 100 pages max, because a content brief does not count towards the 100 URL limit. This means you could write a content brief, then cut and paste the actual content you have already got and analyze it from the briefs section.
Step 7: Hard Code over time and replace pages
This is for the hardcore amongst you with a desperate need to build internal links and schema over a long period on more than 100 pages but without a budget of more than $49 a month. What you CAN do over time is to treat InLInks more as a recommendation technology than as a tool that implements recommendations for you. As long as you have less than 100 TARGET pages for the purposes of linking, then over time, you can create links from all of your pages. The trick is to first max out your 100 pages and set you the targets. Then go to the links tab in the project.
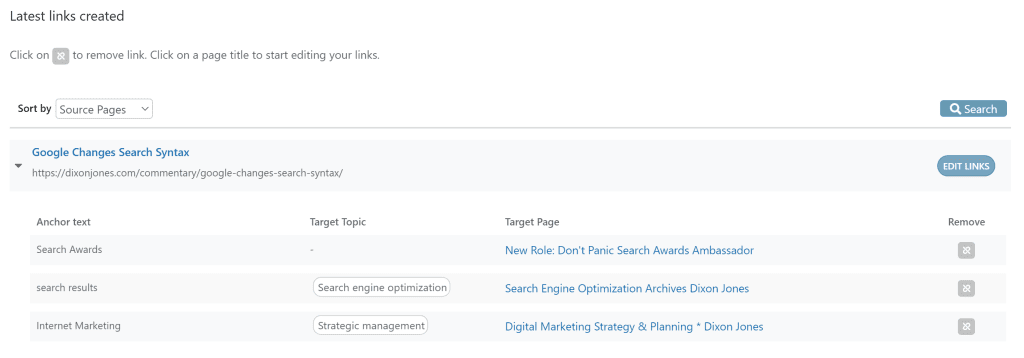
The links are sorted by “source page” order by default. This means you can easily see the links in a list and hard code them onto the site. If you want to see where they are in the text, click the “Edit Links” button and look for the ones with dotted underlines. These are the ones we create using JavaScript. Put these links into your WordPress pages or blog by hand. This means you no longer need these pages in your project! So you can delete them which will give you spare capacity next month to add more pages to your project. To delete a page from a project, go to the Website Pages tab and click on a page title. In the sidebar, click the “Actions” tab or cog to remove the page. BE CAREFUL not to remove pages that have TARGETS set, because when you add more pages, we will not have targets to create new links from the newly added pages.
Using this technique will let you continually build your internal links over time. It can be a little laborious, but it saves money.
Here’s a Recap of What you CAN get with a Low Budget for SEO using Inlinks
We don’t make a big deal out of some of our functionality, but you have:
- A World-class content optimization tool and editor
- A Knowledge graph of your website (How many tools can do THAT?)
- Instant SERP analysis and Keyword difficulty insight from our SEMRush partnership
- Unlimited use of our Topic Trend Analysis tools for keyword (or key topic) research
- An ongoing list of Low Hanging Fruit
- Content Schema optimization and injection
- FAQ Schema creation and Injection
- Internal Link optimization and injection
- World class Question Finder tools
- Free 1 to 1 onboarding session
- Online chat support
* Citation:
The Best SEO tool of 2021 was awarded by the Global Search Awards.
Leave a Reply
Want to join the discussion?Feel free to contribute!