It only takes one line of code on your website for InLinks to save you hundreds of hours on tasks that few web owners ever have time to carry out. Adding the code is the single most important step in the on-boarding process. This page talks about how to add the code and sets out to our strict policies on what we can and cannot do with the code
Note: The code verification should be immediate, but cannot check the javascript is displaying properly until you have associated a topic to at least one page. See “Have you made at least one Topic Association” in the troubleshooting section.
The short version
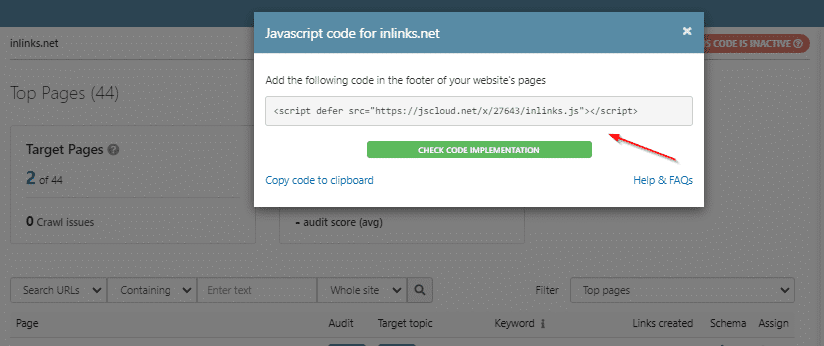
On registering, you will be given one line of code, which we recommend is placed in the footer section of your website, so that the line of code runs on any page that loads on your site. The script will look something like this:
<script defer="" src="https://jscloud.net/x/469/inlinks.js"></script>
This page covers
- Reasons for adding the code
- How to install the code
- How to check the code
- Troubleshooting when we cannot see the code
- WP Rocket Plugin in WordPress
- Using Google Tag Manager to install the code
- Installing on Wix sites
- Installing on Ezoic (new page)
- Security issues and Improving security
- Using CDN instead of JavaScript to create server side rendering
Reasons to add the code
The code helps InLinks to manage internal links on your site and add Schema to your web pages.
- It does NOT collect any personal data (not even the IP numbers) of any users. You should not need to update any GDPR or privacy policies.
- It will not create links OUT of your website. If (in the future) this is a requested feature, every out-link would be entered by the user.
- It will NOT slow down your site. The latency on the code is extremely low.
- It only requires the same 1 line of JS code on every page.
- No server-side slow down as js is rendered by the browser. your site might get FASTER.
- Very little latency
- Links are only integrated
in text paragraphs. Your navigation bars will not be affected. - Internal Links are created without further code, the anchors use exact match, synonyms & sentence fragments.
- Internal linking & Schema is fully interpreted by Google
At any time, you will be able to see the code that is executed.
Where to find the code
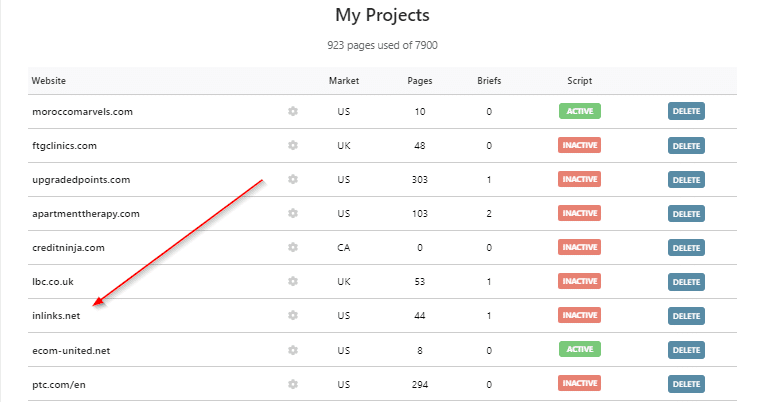
Step 1: Click on the project for which the JS code needs to be installed
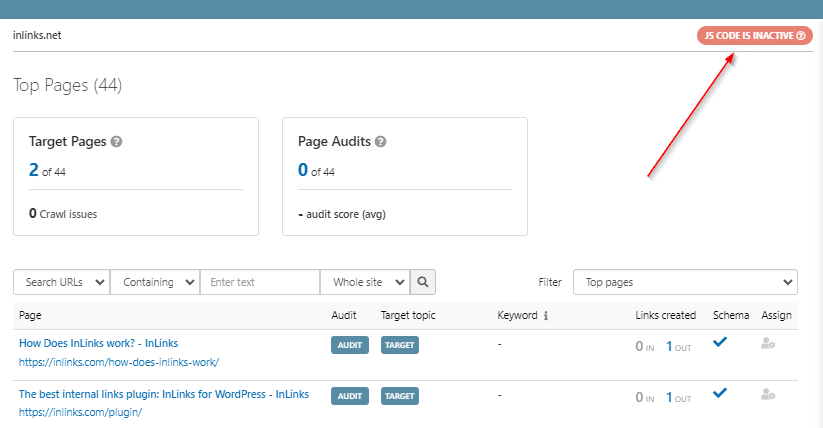
Step 2: Click on the button ‘JS code is inactive’ inside of the project
Step 3: Copy your JS code
Installing inLinks on WordPress
If you are not a coder (or even if you are!), then you may be using WordPress to run your website. If you do, then there are many ways to add the code. For example, install the “Insert Headers and Footers” plugin or the “Header and Footer Scripts” plugin and add the code in the footer section there. You do this by:
- Logging into your blog via the /wp-admin
- Select “Plugins” then “Add New”
- in the search bar, search for “Header and Footer” and select based on the reviews and installs
- Follow the instructions on the screen to make the plugin active and to add the script.
Troubleshooting
When the code is added, checking should immediately be able to verify the installation. If this does not happen, check the tips below.
1: Checking the code is added
We have a button that checks if the code is added under the “links” tab of your project. If we cannot find the script, here are some common issues and fixes.
To check manually, do not use “Viewsource” to look at the code, as you need to inspect the rendered code, not the source. Instead use the “Inspect” button in Chrome (right click on page, “inspect”) or “Inspect Element” in Firefox. You need to check that:
- jscloud.net is in the page using “CTRL F” to find the code
- It is near the bottom of the page
- The ID number being called is the same as the one in your project. This is a four or 5 digit number.
If you need to ask us to check manually, please send a request via the support button.
2: Have you made at least one “Topic Association”?
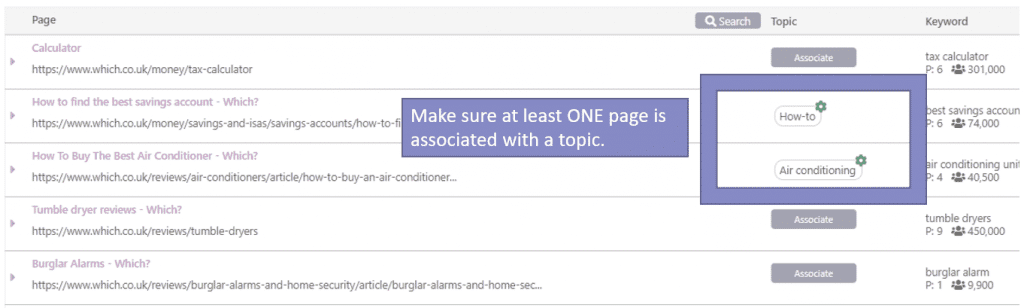
Our check does not just check the raw code. It also renders the page to make sure that bots can see the schema that is generated. In order to do this, you must have associated at least ONE page to one topic. A green “tick” will then also appear next to the page on the project dashboard. No green ticks? Fix this first.
3: Are you blocking our Crawler?
Please check that:
- The IP address 199.16.129.36 is not blocked by your firewall (in fact, you may wish to whitelist this IP address, so we can see and analyze your content).
- The user agent “inlinks” is not blocked by your site
4: Do you use a CDN?
If you use a CDN like Cloudflare, it is quite possible that there is a delay between the code going live and users (and our tool) being able to see the code. This is due to CDNs caching web pages to deliver content faster for users. NOTE: If this is the case, then you may also find that there is a short delay every time youi make changes on InLinks and being able to see links etyc. on the front end. You can purge CDN chaces from within the CDN itself or occassionally from a WP plugin made to support the CDN, or you can simply wait a bit to see the code.
Why Can’t InLinks see my Script in WordPress?
This is often due to a plugin which is caching code. When you log out of WordPress, the code will often not be visible anymore. You can temporarily disable the plugins to see which one, but for many SEOs, a common one is WP Rocket. If so, this will solve your problem: https://docs.wp-rocket.me/article/915-find-the-right-js-files-to-exclude-from-optimization. The file you need to exclude will be https://jscloud.net/x/***/inlinks.js, where the stars are your project ID.
Please just contact us on the webchat if the code is still not recognized by our systems. If we can’t read the code with our bot, we can check manually and make it live for you.
Installing Inlinks using Google Tag Manager
If you are an agency, it is likely that you will not have access to the site itself but may have access to Google Tag Manager. You can use this to insert the code. A good explanation of how to do that is written here (opens in a new tab).
Installing the code on Wix sites
(Thank you to Chris Wright for these instructions):
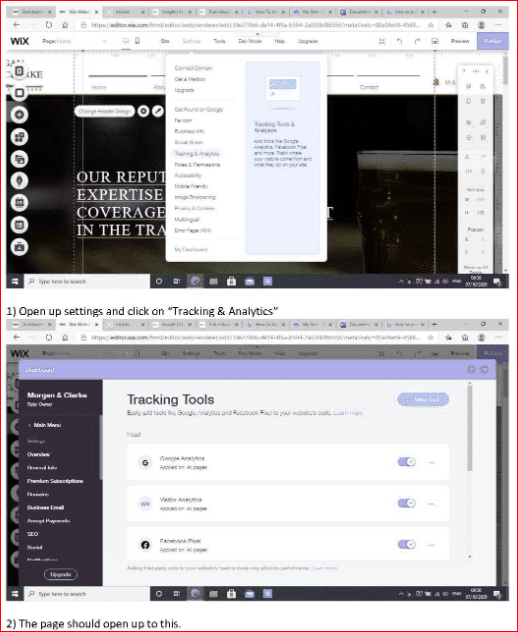
- Open up settings and click on “Tracking & Analytics”
- The page should open up to this. See pics below
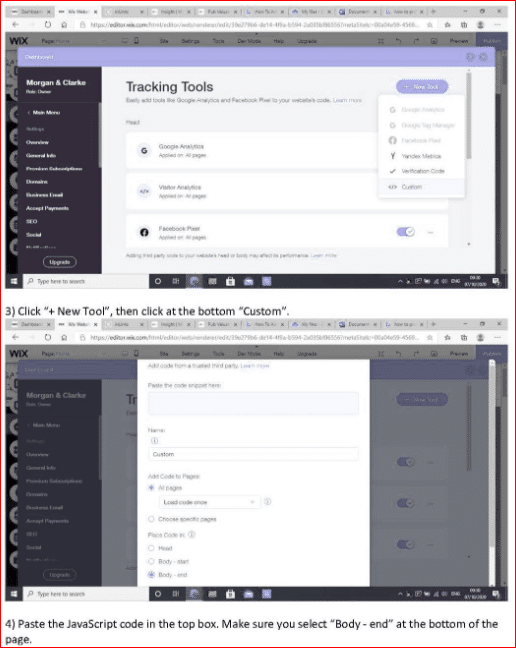
- Click “+ New Tool”, then click at the bottom “Custom”.
- Paste the JavaScript code in the top box. Make sure you select “Body – end” at the bottom of the page.
We also have a video showing how to install the code on Wix sites (thank you Devereaux for the recording!)

Security Considerations
You do not NEED to call the .js file on a third-party server if you do not wish to do so, but you will need a developer or system administrator to amend the implementation process. You can see the actual code executed by simply entering the .js link into a browser. The code for all sites is this (replacing pid=99999 by the PID number for your project)
var getJSON=function(e,n){var t=new XMLHttpRequest;t.open("GET",e,!0),t.responseType="json",t.onload=function(){var e=t.status;n(200===e?null:e,t.response)},t.send()},pid=99999,jsonPath="https://jscloud.net/x/"+pid+"/"+window.location.href.replace(/\/|\.|\-|\:|\=|\?/gi,"")+".json";getJSON(jsonPath=jsonPath.replace("#body",""),function(e,n){if(null===e){var t=document.getElementsByTagName("p"),a=document.getElementsByTagName("li");for(var r in n){var o=n[r].t,i=n[r].a,s=n[r].n;if("p"===o||"li"===o){var p,l=n[r].o;new RegExp(l,"");p="p"===o?t:a;for(var d,c=0;c<p.length;c++){-1<p[c].innerHTML.search(i)&&(searchedString=p[c].innerHTML,d=searchedString.replace(l,s),p[c].innerHTML=d,"p"===o?t[c].innerHTML=d:a[c].innerHTML=d)}}else if("s"===o){var l=n[r].o,u=document.createElement("script");u.setAttribute("type","application/ld+json"),u.appendChild(document.createTextNode(l)),document.getElementsByTagName("head")[0].appendChild(u)}}}});
Your web developer may add this code directly or put the .js file on your own server to avoid a third-party server being able to execute a .js file. In doing so, then only .json (text) files are called from third-party servers, and these are not executable. In this kind of installation, even if a bad actor were to compromise inLinks’ servers, they would not be able to run malicious code on your website by amending the .js file.
NOTE!! If you use this method, the “on/off” switches for the internal links and schema will not work on inlinks.net, because these rely on us modifying the .js file on the jscloud server itself. Check these buttons are switched to “on” before copying the code on JSCloud. (They are on by default).
What is NOT possible to mitigate is a bad actor being allowed access to your inLinks login. From there, they would be able to add links out of context or delete schema. Do not, therefore, provide login details to untrusted third parties. Removing the javascript would, however, remove all changes made by inLinks.net.
In addition, with the standard code installation, we use the global “override” switch to instantly stop (a) all schema and (b) all links generated inlinks. You will find them on the “links” and “schema” tabs. If you would like to verify the installation before it is visible to users, one method is to switch these settings to “off” before adding the code. Then the code’s output can to viewed in the dashboard before making all the links & schema live. Note that the override buttons do not work when a developer adds the full .js file noted above directly on their own website.
Modifying the installation
Your developer has the option to only use the code that generates the schema OR only use the code that generates the internal links. If you require further information on how to do this, please ask via the website.
Still got questions? Get in touch!
On the bottom right of your screen, you should see a chat icon. Please contact us through this if you still have problems, and we will check your code for you. If you are also suppressing our chat icon, you can also email dixon(at)inlinks.net.


Leave a Reply
Want to join the discussion?Feel free to contribute!